Audio-only Live Stream
In this topic, you will learn how to create audio-only live streams.
Introduction
Audio-only live streams allow you to tap into the sizeable audio entertainment ecosystem, including podcasts and radio. With Brightcove, you can ingest and live stream audio-specific content without a video component. Brightcove's player technology has been optimized for audio to mobile, web, and connected home devices. You will even get relevant analytics for audio-only playback.
Requirements
This feature is a paid add-on for your account. Contact your Customer Success Manager to enable audio-only live streams.
Creating and Streaming Audio-Only Channels
- In Studio, open the Live module.
- Click New Channel. You will see two options: Event Channel and Linear Channel.
- Event Channels – Best for one-time or recurring live channels of shorter duration (e.g., concerts, webinars, product launches).
- Linear Channels – Designed for 24/7 continuous streaming (e.g., radio, always-on programming).
- Select Event Channel and click Next.
- Enter an Event Channel Name for your live stream channel.
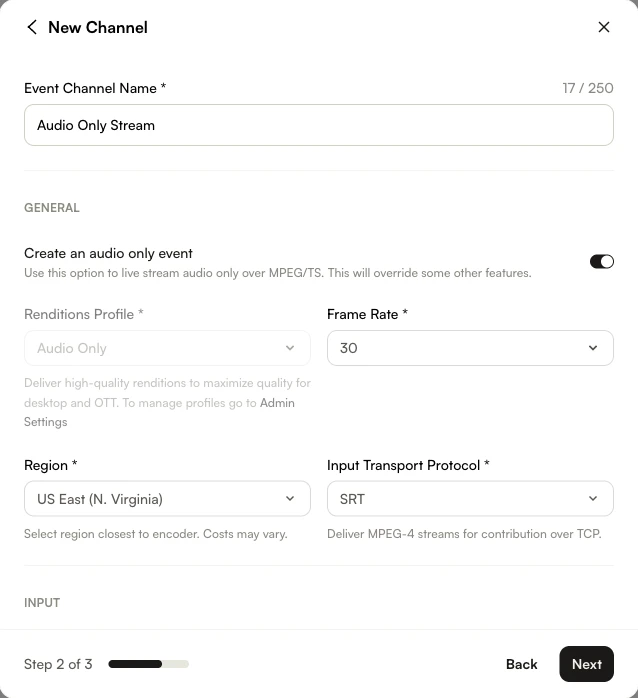
- Enable the Create an audio only event toggle. Notice the Renditions Profile is automatically set to Audio Only and grayed out.

- Select your Region. To reduce latency, select the region closest to where your encoder is located.
- Choose either SRT or RTMP as the Input Transport Protocol.
- (Optional) Enable Convert media asset from Live to VOD when complete if you'd like the audio saved as on-demand after the channel ends.
- Click Next to proceed through the remaining steps, then click Create.
Configure your encoder
Use the encoder of your choice to stream your audio-only channel.
To stream your Live channel, follow these steps:
-
In Studio, return to the Control Room for your audio stream.

- Copy the following:
- Stream Endpoint (SRT/RTMP URL)
- Stream Name
- Paste the values above into the settings for your encoder and start streaming.
For OBS step-by-step usage example, see the Using the Live Module with OBS document.
FFmpeg Command (SRT)
ffmpeg -re -i input.mp3 -vn -acodec aac -b:a 128k -ar 44100 -ac 2 -f mpegts "srt://<account-id>.ingest.live.brightcove.com:5000?mode=caller"FFmpeg Command (RTMP)
ffmpeg -re -i input.mp3 -vn -acodec aac -b:a 128k -ar 44100 -ac 2 -f flv "rtmp://<account-id>.ingest.live.brightcove.com:1935/<account-id>/<channel-id>"This pushes your MP3 file into Brightcove as an audio-only SRT stream.
Publish the live channel
To publish a live stream, follow these steps:
- In Studio, return to the Live module.
- Select Embed on Web in the right corner.
- In the Player section, select your player.
-
Copy the embed code, and paste it into your HTML page.

- Confirm playback in your web page.